
Alicia Garcia | March 5, 2024
Bleached hair is the ultimate canvas for creating literally whatever the f*** you want. Split dyes? Money pieces? Dreamy pastels? Bleach, Please can do it all! And YES, she’s totally DIY friendly! 💅
We’ve come prepared with not only 5 ways to bleach your hair yourself, but also some tips for using Bleach, Please, to provide you with the easiest DIY experience at home. Prior to bleaching, there’s just a couple of things to ask yourself.
How does bleaching work?
And what is the goal I’m trying to achieve with bleaching?
So let’s talk about it! 💖
How does bleaching work? 👱♀️
Essentially, bleach has one job and that’s to open the hair cuticle and dissolve any color from the hair. We’ve formulated Bleach, Please to be as gentle as possible - but at the end of the day, all bleach has the potential to cause damage since it opens up the hair cuticle, which can leave hair feeling dry or rough. Keep this in mind and take care of your hair both before AND after you bleach it! Every Bleach, Please kit comes with full instructions, but the basics of bleaching will always apply. Prior to bleaching, you'll want to give your hair PLENTY of TLC and conditioning!
What is the goal I’m trying to achieve with bleaching? 👀
Maybe you’re trying to go for a pop of color, an all over bleach, a root touch up or just something fun and unique, we want you to feel confident in doing so! With that, let’s jump into the 5 ways to bleach your hair at home, like a pro!
1. Prepping for Pastels 💓

@cheylist in Virgin Pink and Arctic Mist Diluter
No matter your hair level (brunette OR blondes), you’re going to need to bleach your hair to a level 10 in order for pastel hair dye to show up the most vividly. Make sure you’re in a well-ventilated room when you’re applying the bleach, and always wear gloves to protect your hands 🤚 All of your hair should be fully saturated for an even lift, and you’ll want to work as quickly as you can to ensure it all lightens to the same level! We also recommend that you stay ⅛ of an inch away from your scalp when using Bleach, Please for best results and to prevent any possible irritation.
Since this is an all-over bleach job, we suggest sectioning your hair however is most efficient for you! Need to use mirrors to see the back of your head? DO IT!🪞Just be certain to save the roots for last as they tend to lift the fastest and should be applied AFTER you’ve applied the bleach to the ends of the hair already. Be sure to also check your hair every 5 minutes to avoid over processing ⏳
✨ AF Pro Tip: You don’t want to let the bleach sit any longer than 45 minutes regardless of the level of lift, to prevent any serious damage from occurring. Bleach, Please is formulated with some of the best ingredients to prevent damage but remember… it’s still bleach, bestie!
After bleaching, be sure to take note that your hair may have a yellow hue to it and may need to be toned before applying color or else you may not achieve the pastel shade you’re going for. As your bestie, we can’t allow that to happen!

After you’ve rinsed the bleach out, allow the hair to dry 65% of the way. While your hair is still damp, mix a few drops of Periwinkle in a bowl of Arctic Mist Diluter, apply this mixture on your hair, let sit for 45 minutes, and rinse. From there, you’re all set to color your hair with the perfect pastel… Just in time for Spring! 🌸🌿🫧

@mystiquemadeline in Frosé
2. Money Pieces 💰🤑

@glittersailor in Sunset Orange
Looking for a low maintenance way to achieve a pop of color? 💥 Money Pieces are the first thing that comes to be mind because of how easy and it is to do with Bleach, Please plus it’s pretty low commitment!
All you need to do in order to achieve the perfect money piece at home is evenly separate your face-framing pieces of hair from the front and section them off. Once you’ve got this section secure, tie the rest of your hair back!
From here, simply follow the directions included in each Bleach, Please Kit to lighten those front pieces! Apply a stunning color over it and you just created a work of art! 😍

@lizblendz in Purple AF, Virgin Pink, Arctic Mist Diluter
Pssst… You can also do just your bangs using the same method! 👇

@__panterra_yoga__ in Cosmic Sunshine and Sunset Orange
3. Root Touch Up 🖌️
If you just wanted to touch up your pastel or you’re going for a Billie Eilish vibe with vivid dyed roots, we got you!

@caitlyn_calupad in Poison
It’s good to know that we have generally thicker hair in the back of the head and thin and more delicate hair in the front, causing the back of the head to take a tad longer to lighten.
To best approach this, we recommend separating the hair into 2 different sections… The front face-framing pieces and the back of your head. However, if you’re just looking for color on the top of the head and not necessarily all of your roots, you’d just section off that spot and work at the roots where you’d like to apply the color 🥰
For all-over root bleaching, the steps are as follows:
Starting with the back of your head, you’ll want to clip the majority of your hair up and leave only the very bottom pieces of the hair in the back. Using a dye brush, you’ll apply the bleach to just the roots and continue working your way all the way up the back of your head, until the upper and under sides of each section have been covered in the bleach mixture ☑️
🏃♀️ Quickly and steadily, you’ll now proceed with the front face-framing section that we had separated earlier. Cover all of the roots until you’ve coated them in bleach and as mentioned before, check on your roots every 5 minutes to be certain you don’t leave the bleach on any longer than necessary. Rinse … and you’re ready to go in with your favorite pastel or even bold red! The world is your oyster, babe! 🌈
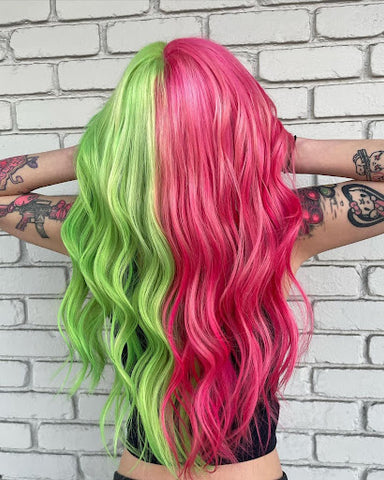
4. Split Dye 🧑🎤👩🎤
One of the easiest methods to bleach + dye your hair and one of our personal favorites… the split dye! 🤩 I’m sure you’re thinking that you’re just going to section the hair into 2 sections based on where the split dye is going to be (down the middle, split dye on the bangs, horizontally, etc) and you’re absolutely right! … See! You’re a DIY pro already 😜
Section the hair, follow the instructions provided and save the roots for last. We even love to see one side of the split left uncolored and only bleached. Yep, that’s it! Now for the fun part… the inspo!
✨ AF Pro Tip: You can even just bleach one half of your hair and leave the other half your natural color. This look is such a stylish yet effective way to add some color to your hair and still give the illusion of a multi-colored look!

@hadar_kawaii_hair in Violet Dream, Poseidon, Aquamarine, Neon Moon, Iris Green

@jeks951_ in Poseidon, Blue Jean Baby
@selinamirza in Electric Paradise, Virgin Pink, Space Cowgirl

@neg4tive_creep in Electric Paradise, Sunset Orange, and Virgin Pink
5. Bleach Bath
This method is actually most commonly used to remove a stubborn hair color but this also can help you achieve a blank canvas yet again, to pursue your new hue 😘
What you’ll need:
- Water
- Dandruff shampoo
- Bleach, Please Kit
To start, you’ll want to first attempt a color remover meant for semi-permanent color. If there is still color remaining, go ahead and get started with your bleach bath. Mixing your bleach and developer first, you’ll add in one good squeeze of anti dandruff shampoo (can be a cheap dollar store shampoo or whatever you can get your hands on) and then add in about ⅓ a cup of water or until the mixture appears smooth and not too runny.
Applying this mixture to the middle and ends of your hair (avoiding the scalp and roots completely) go ahead and cover only the color-treated hair and let it sit for no more than 5-7 minutes before you rinse. While you’re rinsing, we recommend using a purple shampoo to tone the hair at the same time. This gives you an even outcome and a perfect canvas to begin your new masterpiece!

@stjohnnnn in Bleach, Please
Now that we’ve gone over 5 ways you can bleach your hair at home using our Bleach, Please Lightening Kit, which one will you be trying? Whichever you choose, be sure to tag us! 🤳
Need more inspo pics before making a decision? Check out our Instagram for endless amounts of inspiration! And of course, if you ever have any questions or need help mixing up the perfect custom shade, send us an email at support@arcticfoxusa.com. We’re always here to help 🫶
Happy coloring, Fox Fam! 🎨
Related Articles

Meagan Swartwood | July 21, 2026
How to Choose the Best Hair Bleaching Kit for You!
Bleaching your hair has never been easier with Arctic Fox Bleach Kits. Discover the 4 go-to options made to achieve that platinum, brightness, or gentle lightening you are going for.
Read More
Meagan Swartwood | March 31, 2026
How to Bleach Hair at Home without Damage
Learn how to bleach hair at home safely without causing breakage. This guide covers hair porosity, developer volumes, and pro tips to keep strands healthy and hydrated.
Read More
Meagan Swartwood | December 23, 2025
Holiday Hair Glow Up: Easy At-Home Color Transformations for Every Vibe
Ready for a holiday glow up? Explore easy, at-home hair color transformations perfect for every vibe this season with Arctic Fox.
Read MoreMeagan Swartwood | July 21, 2026
How to Choose the Best Hair Bleaching Kit for You!
Bleaching your hair has never been easier with Arctic Fox Bleach Kits. Discover the 4 go-to options made to achieve that platinum, brightness, or gentle lightening you are going for.
Read MoreMeagan Swartwood | March 31, 2026
How to Bleach Hair at Home without Damage
Learn how to bleach hair at home safely without causing breakage. This guide covers hair porosity, developer volumes, and pro tips to keep strands healthy and hydrated.
Read MoreMeagan Swartwood | December 23, 2025
Holiday Hair Glow Up: Easy At-Home Color Transformations for Every Vibe
Ready for a holiday glow up? Explore easy, at-home hair color transformations perfect for every vibe this season with Arctic Fox.
Read More